Showing posts with label Woodstove Cooking. Show all posts

Sunday, October 25, 2015

Woodstove Cooking: Easy Stovetop Chili

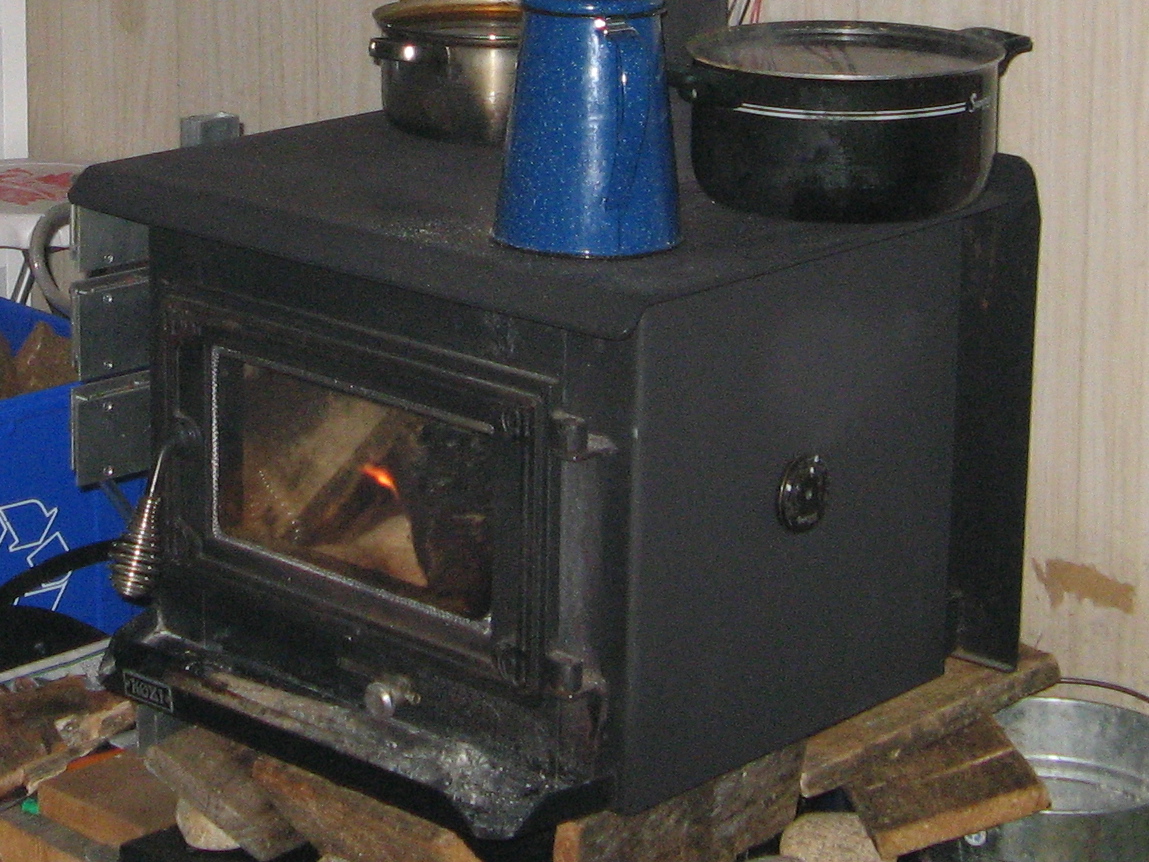
Evenings are cool, so the Kozi woodstove is usually fired up to warm the cabin. On those nights, I like to use the "free" heat to cook dinner. One recipe that's easy to make is stovetop chili because I usually have all of the ingredients as staples on the shelf at my cabin.

Easy Stovetop Chili

19 oz (540 mL) can red kidney beans drained
14 oz (398 mL) can green beans diced
19 oz (540 mL) can tomato juice
½ small onion chopped
¼ bell pepper chopped
2 cloves garlic chopped
1 package chili seasoning mix
1 tablespoon chili powder
1 teaspoon cumin
½ lb ground beef cooked

First crumble and cook the hamburger in a heavy metal pot. Drain fat if needed. Add all remaining ingredients including the liquid from the green beans. Cover and return the pot to the stovetop. Cook slowly for about an hour or until thick and bubbly. Stir frequently, especially if you are using a woodstove and the fire is hot. Add water as needed. Substitutes I use for hamburger include one 5 oz (or 184 g) can of chicken or turkey, or leftover meat chopped or shredded.

I like to make fresh bread on the same day to complete the meal. My Buttery Sourdough Pan Rolls are a good choice.

Follow this link if you want to see the recipe. -- Margy

Wednesday, March 13, 2013

Woodstove Cooking: Imperial Stove Thermometer

I purchased an Imperial Magnetic Stove Thermometer at Valley Building Supplies in Powell River.  This magnetic thermometer is designed to show safe operating temperatures to avoid creosote formation and overheating. During normal operations, I put in on the stovepipe to monitor the exhaust temperature.

When we're using our woodstove thermoelectric generator, I put the Imperial thermometer on the side. The generator modules have an operational temperature range from about 250 to 325 degrees Celsius  (482 to 617 degrees Fahrenheit).

A fire that's too low won't generate electricity.  One that's too hot will damage the power modules.  Our generator, cooled with lake water, produces a trickle charge for our cabin batteries during winter months when the solar panels aren't very productive.

It also works as an oven thermometer or to check the metal stovetop surface for cooking temperatures. It has a handy wire handle to lift it in and out of the cast iron dutch oven I use for baking on top of my woodstove. I was surprised to learn that the interior temperature gets up to 300 degrees Fahrenheit. Based on my cooking times I would have guessed less. For $14.95 (CAD) I thought this multi-purpose Imperial thermometer was a good value. -- Margy

Monday, December 10, 2012

Woodstove Cooking: Sauteed Kale "A Hot Mess"

Sometimes you think you invented something, only to find it elsewhere a short time later.  That's what happened with the kale dish I made on top of my cabin wood stove. My winter greens are producing well, so I though I would experiment a bit.

Sauteed Kale
Also Known as "A Hot Mess"

5 cups fresh kale
1/4 small onion
2 cloves garlic
1 teaspoon thyme leaves
1 tablespoon olive oil
1 tablespoon lemon juice
1 tablespoon water
salt and pepper to taste   
1/4 cup walnuts


Saute onion and garlic in olive oil until tender. Add crushed thyme leaves to release flavours. Tear kale leaves and add them a few at a time to the pan to wilt.  Sprinkle with lemon juice and water to help with the wilting process.  Add walnuts broken into pieces.  Cook uncovered until the kale is firm, but tender.

 This simple dish can be either a side dish, or a main course, depending on your mood.  Stay tuned tomorrow to find out about the newest pub in Powell River, BC.  They have a small, but interesting menu, including a small entree they call "A Hot Mess." -- Margy

Wednesday, March 09, 2011

Woodstove Cooking: Simple Soup Supper

Last week I was alone at the float cabin. I don't like cooking for one, so a simple homemade soup seemed to fit the bill. Wayne left some roast beef in the fridge (he does cook for one) and I always have a few root veggies on hand. With a few fresh 'shrooms I grabbed in town, I had all the fixin's needed.

Simple Vegetable Beef Soup

2 cups water
1 packet beef bullion
1/2 cup diced roast beef
1 carrot course chopped
1 small potato course chopped
1/4 onion course chopped
2 mushrooms sliced
1 cup fresh Swiss chard
salt and pepper to taste
seasonings to taste
(my herb blend is called Margy's Mix)
sprinkle with Parmesan cheese before serving

As you can see, my wood stove gets lots of action. In addition to my pot of soup, you can see the ubiquitous two pans of water heating, my red coffee pot, and an old coffee pot used for water. We drink our lake water, but boil it first. A hot wood stove can get it all done at no extra cost. Whether you are at home in the city, or at a remote cabin, a simple soup supper is a tasty end to a cold winter day. -- Margy

Tuesday, March 03, 2009

Woodstove Cooking: Firebox Baked Potatoes

I just had a wonderful, quiet week at my float cabin on Powell Lake in Coastal BC. It may sound like an expensive thing to do, but actually, it's a very economical way to live. Because the cabin is off-the-grid, there are few ongoing costs. But we have a few enhancements to make our life more comfortable. One of those is our wood stove.

Our stove kept me comfortably warm each day. The light from it's perpetual flame brightened the dark nights. An added benefit was cooking one of my favourite comfort foods - baked potatoes. It's simple, but oh, so satisfying.

All of my home grown potatoes are gone, so I bought a few Russets. Wash, dry and rub the skin with a little margarine. That's all except for double wrapping it in aluminum foil, carefully sealing the edges so that none of the margarine leaks out onto the stove.
I placed the foil wrapped potato on the shelf at the front of the fire box. Turn it once and in half an hour it's ready to eat.

I love my baked potato loaded. I planned ahead and had the toppings ready to go. Yum - just the right thing to warm up my tummy on a cold winter night in front of the fire.

Want to check out some of the other things I've cooked on or in my wood stove? Take a look at these:

Pouch Potatoes
Wood Stove Sourdough Wheat Bread
Baking Powder Biscuits
Dutch Oven Rustic Apple Pie
Dutch Oven Apple Crisp
Easy Chili
Dutch Oven Pineapple Upside Down Cake
Cabin Carrot Cake
Cornbread
Do you do any wood stove or stovetop baking? I'd love to hear your recipes. - Margy

Wednesday, November 05, 2008

Woodstove Cooking: Pouch Potatoes

In September, I shared how to cure and store onions and in October, how to store potatoes for use throughout the winter. I went into my stash last night to make one of my favourite comfort food side dishes. I call it "Pouch Potatoes."

The ingredients can vary, but my staples are potatoes, onions, green peppers and herbs. Start with a large rectangle of aluminum foil. Using a paper towel, spread about one teaspoon of margarine up to about one inch of the edge. Slice potatoes (enough for two servings) and place them on the foil. Top with sliced onions and green peppers. Sprinkle with salt, pepper and herbs. I like Rosemary, Thyme, Basil and Sage, but you can use whatever you like. Pull the foil up and seal the edges by folding them over several times. This makes a cooking pouch that should not leak. I sometimes use a second piece of foil to double the pouch, especially when I am going to cook the potatoes in my wood stove. I don't want any grease to leak onto the bricks.

I cook my "Pouch Potatoes" in two ways. If we are barbecuing, I put them on the grill for about half an hour, turning them several times to brown on both sides. If I have my wood stove going, I cook them inside near the front after the wood burns down to coals. Either way, they make a tasty side dish for meat, fish or chicken. Give them a try. They're so easy they almost cook themselves. -- Margy

Wednesday, April 23, 2008

Woodstove Cooking: Stovetop Baking

My good friend Helen in Powell River always offers me tea and "nummies" when I come over for a visit. In case you aren't familiar, a nummy is something delicious, yummy. Helen's nummies range from macaroons dipped in chocolate to sweet muffins. Ed's sure a lucky husband. He get nummies all the time.

At our cabin, I like to bake nummies of my own. Since our wood stove is going 24/7 during winter, I've created some unique ways to bake including a gutted toaster oven and a cast iron dutch oven. Here are a few of my nummy success stories. Follow the links for the recipes.

Toaster Oven Cabin Cake -- This cake doesn't have any eggs, perfect for minimal cabin ingredients. The toaster oven traps the radiant heat. Cooking time is slow, but this moist cake still comes out great.


Dutch Oven Rustic Apple Pie -- I put a metal rack inside my cast iron dutch oven and bake cakes and pies using the trapped heat. I used my wood stove thermometer and it gets to about 300 degrees inside. Some heated rocks on top of the pot to provide extra heat.

Dutch Oven Pineapple Upside-Down Cake
Here is another stovetop dutch oven favourite. The cake is really rich, but nummies are NOT meant to be diet fare.

Thanks for looking at my "nummies" pictures. Stay for awhile, take a look at my index, there's lots more to see. Or come to www.PowellRiverBooks.com for more information about Wayne's Coastal BC Stories series of books. -- Margy

Thursday, February 28, 2008

Woodstove Cooking: Sourdough Wheat Bread

I’ve wanted to bake bread for a long time. The problem, I don't have an oven at the float cabin. Then I thought, why not try inside my wood stove. I purchased an extra stove brick to create a flat baking surface and got some hot coals going. But I’m getting ahead of myself. Making bread is an all day affair.

The night before I got my sourdough starter out and fed it. By morning it was good and bubbly. I chose a recipe from the Family Circle Illustrated Library of Cooking (look in a used bookstore for this out-of-print collection) and cut it in half to make one loaf for my small “oven.” Here it is:

Sourdough Wheat Bread

½ envelope active dry yeast (1 1/8 teaspoon)
½ cup very warm water (100°F/38°C)
¾ cup sourdough starter
1 tablespoon sugar
1 teaspoon salt
2 ½ cups flour
  1. Sprinkle yeast into very warm water with half the sugar and let stand 10 minutes to foam. This will ensure your yeast is good.
  2. In a large bowl blend the yeast mixture, sourdough starter, remaining sugar and salt. Beat in 1 cup all-purpose flour until smooth. Add 1 cup wheat flour a little at a time until completely incorporated. Mixing at the end is easier with your hands.
  3. Turn out on a board and knead for 10 minutes. I don’t have a board so I use plastic wrap taped to my counter. Use the remaining flour as needed to keep the dough from sticking.
  4. Form into a ball and place in a greased bowl. I use margarine. Roll it over to coat all sides.
  5. Cover with a towel and put in a warm place to rise (1-2 hours or until double in size).
  6. Punch the dough down, turn it out on a board, cover it with the bowl and let it rest for 20 minutes. While you wait, grease a 9x5” baking pan (or cookie sheet) and sprinkle it with cornmeal. I used a baking pan because of the limited space in my wood stove.
  7. Knead the dough a few times and then roll it into a loaf shape. Pinch together any open seams on the bottom. Place the dough in the baking pan, cover with a towel and put in a warm place to rise again (1 hour or until double in size).
  8. Make slits 2” apart on the top to prevent cracking. If you like a crispy crust, mix 1 teaspoon corn starch with ¼ cup water. Brush the surface of the bread before and once again during baking. Use aluminum foil to shield the bread if using a wood stove.
  9. Bake for 40 minutes in a 400° oven. When the bread sounds hollow and is golden on top it should be done. When I took mine out of the pan it felt a little raw on the bottom. I put it bottom side up and returned it to the oven for 10 minutes. An extra benefit was a crispy crust all around. Yum!
I did have one problem using my wood stove. As the baking progressed my coals started to cool. About half way through I had to add a small log and let it catch before returning the bread to the firebox. Because of the flame, a corner burned slightly. Next time I will start with more coals and maybe this won’t happen again.

There was one other problem. Now I know why bread recipes have enough for two loaves. We ate almost the whole thing right when it came out of the oven. But there’s always another day, especially in the winter when the woodstove heat is free.

Do you have any cabin or camp cooking recipes? I'd love to hear them.

Sunday, December 02, 2007

Woodstove Cooking: Baking Powder Biscuits

When I am making soup or chili for dinner on my wood stove, I like to make a quick bread to go with it. This recipe for baking powder biscuits comes from my trusty Fannie Farmer Cookbook. The following is a half-size recipe so I can fit it all on one pan in my my small stovetop oven.

Baking Powder Biscuits
1 cup flour
¼ teaspoon salt
2 teaspoons baking powder
½ tablespoon sugar
¼ cup margarine softened
½ cup milk

Mix the flour, salt, baking powder and sugar in a bowl. Cut the margarine into the dry ingredients with a pastry cutter, knives or fork until it is like a coarse meal. Add the milk and stir until blended. For an extra taste treat, you can add ¼ cup of grated cheese to the batter before baking. Drop the biscuits on a greased pan and bake 15-20 minutes in a conventional oven at 425 degrees or until brown. In my stovetop oven, it takes a little longer for the biscuits to bake. To get them crispy and golden on both sides, I flip the biscuits half way through the baking process.

Do you do stovetop baking? I would love to share recipes with you. -- Margy

Tuesday, November 27, 2007

Woodstove Cooking: Dutch Oven Rustic Apple Pie

We use our woodstove 24/7, so why waste all that heat. The best time for baking is when we first get back from town. A roaring fire gets the cabin warm and toasty, and bakes a yummy pie at the same time. For this simple pie I used my cast iron dutch oven on top of the stove. I also used some heated rocks on top for better browning.

Stovetop Dutch Oven Rustic Apple Pie

Make dough for an 8" pie crust:

1 cup plus 2 tablespoons flour
1/4 teaspoon salt
1/3 cup shortening
2-3 tablespoons cold water

Mix flour and salt. Cut in shortening until the mixture looks like course meal. Sprinkle water over the mixture a tablespoon at a time and mix. Use only enough water for the pastry to hold together when pressed into a ball. Roll out the dough on a lightly floured board. Rough edges are not a probelm. They add to the rustic look. Press the dough into a pie pan.

Apple Filling

1/2 cup sugar
2 tablespoons corn starch
1 tablespoon cinnamon
1 teaspoon nutmeg
4 peeled and sliced apples
1 egg white lightly beaten
1 teaspoon sugar for glaze

Mix sugar, corn starch, cinnamon and nutmeg and toss with apples. Spoon into the unbaked crust. Fold extra crust over the edge of the apples to seal in the juices. Brush the crust with egg and sprinkle with sugar.

Bake in a preheated dutch oven. I used my new thermometer and it registered about 300 degrees inside. The first 40 minutes are on a rack 1/2" above the bottom of the dutch oven. Then raise it on a 3" rack for 40 minutes more. Crack the lid to let steam escape for the last 60 minutes.

Your time may vary. If you are using a conventional oven, bake at 425 degrees for 20 minutes or until the apples are bubbling and the crust is brown.

Stovetop baking is a challenge, but the results are always a welcome addition to our cabin fare. Do you have any stovetop recipes? I would love to hear your experiences. -- Margy

Thursday, April 19, 2007

Woodstove Cooking: Dutch Oven Apple Crisp

I’ve also baked Apple Crisp using my Dutch Oven. I put a wire rack in the bottom and place the baking pan inside. This way the crisp doesn’t burn while the Dutch Oven is directly on the stove’s hot surface. Hot rocks on the lid help with top browning.

Dutch Oven Apple Crisp

The ingredients and preparation for this Apple Crisp are simple for cabin or camp cooking.

4 Granny Smith or tart apples
2 tablespoons flour
½ cup granulated sugar
1 teaspoon cinnamon
½ teaspoon nutmeg

Core, peel and slice the apples. Mix apples, flour, sugar, cinnamon and nutmeg in a bowl. Place mixture in a greased 8” round cake pan that is at least 1” deep. I use a metal pan to better conduct the heat.

¼ cup softened margarine
½ cup flour
½ cup quick cooking oats
½ cup dark brown sugar
1 teaspoon cinnamon

Mix topping ingredients in a bowl until crumbly. I find fingers work best. Sprinkle over the apples. The pan will be very full, but the apples will cook down. Bake for 30 minutes at 350 degrees in a conventional oven or until the topping is browned and the apples are bubbling. In my Dutch Oven it takes about one hour. Watch, it may bubble over. It is great with ice cream (if available) or whipping cream (a cabin standby). -- Margy

Saturday, April 07, 2007

Woodstove Cooking: Dutch Oven Pineapple Upside-Down Cake

I used my trusty Fannie Farmer cookbook to find a recipe that I could use to Dutch Oven Pineapple Upside-Down Cake on top of my woodstove. Here's my version of the recipe using oil in the cake rather than margarine. It comes from Fannie's Quick Gold Cake recipe on page 826. The resulting cake is rich but with less fat than recipes using margarine.

Dutch Oven Pineapple Upside-Down Cake Revised

Arrange 4-5 slices of canned pineapple in one layer in a greased 8” round cake pan that is at least 1” deep.

3 tablespoons margarine
¾ cup dark brown sugar
¼ cup pineapple juice
Dash nutmeg

Melt margarine on low heat. Add sugar and heat until blended. Add pineapple juice and heat until everything is dissolved. Add nutmeg. Pour over pineapple.

1/4 cup vegetable oil
1/2 cup milk
1 egg (or substitute) beaten
1 teaspoon vanilla

Mix liquid ingredients with the beaten egg.

1 1/8 cup flour
2 teaspoons baking powder
½ teaspoon salt
2/3 cup sugar

Mix flour, baking powder, salt and sugar in a bowl. Add wet ingredients and stir until blended. It will be thick. Spoon the cake mixture over the pineapple and smooth the top. Some of the sugary liquid may ooze up. Bake for 35 minutes at 400 degrees if you are using a conventional oven.

I use a cast iron Dutch Oven on top of my KOZI wood-burning stove for baking. First, I place the pot and lid on top of the stove to heat. After I place the cake pan inside, I put hot rocks on top of the lid as an additional heating source. Replacing the rocks with hotter ones throughout baking keeps the temperature higher. I use a wire rack in the bottom on the Dutch Oven to keep the baking pan from burning on the bottom.

During the last half hour of baking, I put the tip of a wooden spoon under the lid to make a small crack. This lets the moisture out and allows for a little more browning. Baking it this way, it takes about an hour (depending on the heat of the fire). It always bubbles over a bit. When the top starts to brown, and a toothpick comes out clean, it is done. I like to serve it warm with whipped cream on top. Yum!! -- Margy

Wednesday, January 24, 2007

Woodstove Cooking: Cabin Cake

Using a frying pan with hot rocks was successful for stovetop cornbread, but I wanted to do some baking that just wouldn’t work as well in such a small “oven.”

I found a Coleman Camp Oven, but the price was a little high. Then I found a wood stove version that got me thinking.

I found a toaster oven at the Hospital Auxiliary Thrift Store for $5.00 with a one week guarantee which I immediately voided by removing the plastic siding, stripping out the wiring and taking off the bottom drop-door. I place the stripped oven on top of my KOZI wood stove. The heat radiates up and is trapped in the oven compartment. I regulate the temperature by stoking the fire or letting it die down. It isn’t an exact science, but the price was right.

My first recipe was from The Fannie Farmer Cookbook. “War Cake” has ingredients that fit wartime rationing, and I needed one with no eggs. I made a few modifications and call it my Cabin Cake.

Stovetop Cabin Cake
¼ cup raisins
1 finely sliced and chopped apple
2 tablespoons margarine
1 teaspoon cinnamon
½ teaspoon ginger
½ teaspoon cloves or allspice
1 cup dark brown sugar
1 cup water

Heat ingredients together in a pan until melted and the raisins plump. Cool slightly.

1 ½ cups flour
1 teaspoon baking powder
1 teaspoon baking soda
½ teaspoon salt

Mix the dry ingredients in a bowl and then add the wet mixture. Stir until blended. Add ½ cup chopped pecans (or walnuts) if desired. Pour into a greased and floured 8X4” loaf pan and bake for 25-30 minutes at 350 degrees in a conventional oven.

In my wood stovetop oven it takes about one hour. When a toothpick comes out clean, it is done. I serve warm slices topped with whipping cream. A great winter treat! -- Margy

Tuesday, January 16, 2007

Woodstove Cooking: Cornbread

Wayne and I were pure "cityfolk" when we discovered Powell River. We had to learn more self reliance, especially living in a float cabin on Powell Lake. We've had lots of help from our friend John, but in the kitchen, I've had to do my own experimenting.

We have a propane stove and refrigerator, but our KOZI wood stove is going all day and night during the winter. It provides us with heat, but I hate to see all that energy go to waste. So, I started experimenting with stovetop baking. I've tried several methods. The first successful one was using a frying pan and rocks.


I needed a heavy metal pan with a flat, recessed lid. I've become a second-hand store fanatic. My favorite in Powell River is the Hospital Auxilliary Economy Shop next to Scotiabank. One day I found this pan for only $4.00. I grabbed it quick. To keep things from burning on the bottom, I use a wire rack inside. Next I needed a small cake pan to fit inside. New ones have handles that make them too big. I went to another second-hand store and found the perfect 8" pan.


First, I heat the pan and smooth rocks I gathered from Sandy Beach near our cabin. I thought of using rocks as an extra heat source after reading dutch oven recipes. I can't use hot coals in the house, but hot rocks serve a similar purpose. I rotate heated rocks throughout baking to keep the temperature higher. The recessed lid keeps the hot rocks securely in place.

My first success was cornbread using the recipe from the cornmeal bag cut in half. My results vary based on the size of my fire. One drawback to stovetop baking is that you need a hot fire. We've been known to open the door to let some cool air in on baking day.

KOZI Stovetop Cornbread

1/2 cup cornmeal
2/3 cup flour
1/4 cup sugar
1/2 teaspoon salt
1 tablespoon baking powder
3/4 cup milk
1 egg
3 tablespoons oil

Combine the flour, cornmeal, sugar, baking powder and salt. Beat together the milk, egg and oil. Add to the dry mixture and stir to combine. It will be thin. Pour into an 8" greased cake pan. Bake 15-20 minutes at 400 degrees in a conventional oven. In my frying pan on the stovetop, it takes about an hour. I leave it covered for the first 30 minutes. After that, I leave a crack in the lid to let the steam escape. This allows the top to brown more easily, but does extend the cooking time.

Sometimes it gets very crispy on the bottom (which we love) and not as cooked on the top. Lots of butter and honey make it good no matter what. -- Margy