Sunday, July 10, 2022

Growing and Preserving Garlic

Cabin life changed during Covid. Getting home for spring planting was difficult. Either we couldn't get here, or our timing was too early. In September, I cleaned my float garden, covered parts to prevent unwanted weeds, and planted flower bulbs and garlic.

At first I grew garlic in containers.

I've grown garlic for years. In the beginning, it was in small containers. I got plenty, but the bulbs were on the small side.

Now I grow it in my float garden. Garlic takes little attention. Plant cloves with the point up, mulch, water, feed periodically, dig, dry, and enjoy.

I purchase garlic bulbs good for my climate at the nursery. I also save my best bulbs for future planting.  A few bulbs go a long way. You separate the cloves and plant them seven inches apart. I plant in fall, mulch through winter and harvest in early summer.

Flower and garlic bulbs (in the front) sprouting in early March.

When the tops wilt, brown, and fall over, it's time to pull the bulbs. 
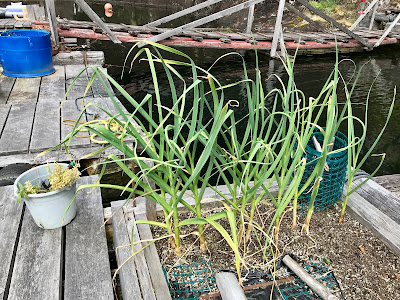
Tulips have died back and garlic approaching maturity.

If the weather is sunny and warm, I leave them on the cabin deck to dry.

Garlic drying on the deck on a sunny summer day.

After the surface of the bulbs has dried, I brush off any dirt and tie the tops of several together for hanging. Nothing goes to waste. I saved the trimmings for garden mulch.

Processing garlic for storage: Trimming and tying in bundles.

I hang them in a protected spot outdoors to continue drying. This starts the preserving process.

Garlic hanging to dry in the floating woodshed.

I leave them outdoors until the skin on the bulbs is dry and flaky. I then hang the bundles in the cabin's storage room. By this time there's no odour, and they're handy to grab for cooking.

Dried garlic hangs in our storage room ready for use.

If you live in an apartment with a balcony, or a home with limited garden space, you can grow garlic in a container and have plenty left over to share with friends and family. -- Margy

*************************************

Shared with Your the Star at Stone Cottage Adventures. And Tuesdays with a Twist at Stone Cottage Adventures.

Visit Simple Life Mom for ideas about homesteading and simple living.

And Sunday Sunshine Blog Hop at Ridge Haven Homestead.

Visit Letting Go of the Bay Leaf for more Mosaic Monday.

Friday, July 01, 2022

#Throwback Thursday: Composting Without a Compost Pile

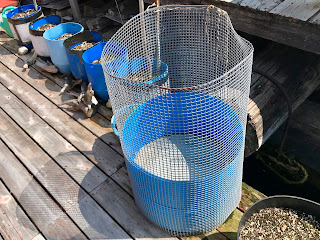
My former wire bin composter.

During the early years we had shore access. Four years ago our lease required us to remove our stairs to the outhouse (decommissioned in 2018 for an on-float compost toilet), my hillside potato patch, and my compost bin. I had to find an alternative for composting kitchen and garden waste on the cabin deck or in my floating garden.

One method I learned about is called chop and drop. Chop and drop works well for garden waste.

As plants are trimmed or removed, the residue is chopped into small portions and used as mulch in garden beds and plant containers. The majority of my composting needs are taken care of in this manner.

Cutting a plastic 55-gallon barrel in half.
It doesn't work as well for kitchen scraps because the smell can attract critters. I decided to compost kitchen waste in a 55-gallon plastic barrel cut in half. Barrels in my town cost about $40. Check nursery, building and farm stores, or use a large plastic trash can that isn't too deep.

Now that last year's batch of soil is ready to use, I'm starting over.


Composting in a Plastic Barrel
Step by Step

A kitchen compost container.
Cut the barrel in half. Drill drain holes in the bottom. Make two composters or use the other half as a planter.

Place four inches of soil in the bottom to start.

Use a kitchen compost container for fruit and vegetable trimmings chopped into pieces.

Layering chopped plant matter, Rot-It and soil.
When the container is full, spread the contents over the layer of soil.

Add garden trimmings if you have them.

Sprinkle with compost accelerator. I use Rot-It.

Moisten with water.

Add 1" of soil over fresh items.

A cover cut to fit and a plastic mesh cage.
Cover with a porous material and surround with a cage to keep small critters out. If you live in bear country, enclose your composter.

When it's time to add a new layer, stir the ones below first.

Continue layering waste and soil until the barrel is full.

Let your composter rest with it's porous cover on for several months while the organic matter decomposes. Periodically moisten and mix to encourage the composting process.

Compost turned into rich soil in 8 months.

Your rewards will be less kitchen and garden waste going into the garbage stream, and free rich soil coming into your garden.

Do you do compost? What process do you use? Do you have any tips to add to my post? -- Margy

If you've ever dreamed of living away from town in an off-the-grid home, or in town with a simple lifestyle, you'll enjoy reading Off the Grid: Getting Started.

Smashwords ebooks for $4.99

Or go to PowellRiverBooks.com for more ordering information.

*************************************

Shared with Your the Star at Stone Cottage Adventures. And Tuesdays with a Twist at Stone Cottage Adventures.

Visit Simple Life Mom for ideas about homesteading and simple living.

And Sunday Sunshine Blog Hop at Ridge Haven Homestead.

Visit Letting Go of the Bay Leaf for more Mosaic Monday.