Wednesday, November 28, 2018

Off the Grid Float Cabin YouTube Video Reaches Over One Million Views

You may have read about this on my Margy Meanders blog, but I think it's amazing enough to share again here.

Back in 2012, I sent pictures and video clips about living off the grid in our float cabin home to Kirsten Dirksen in Spain. She has a YouTube channel that focuses on tiny homes, simple living and other interesting topics. Kirsten took the raw images I sent and put them together into a video for her channel.

A look at the YouTube page with our 1,000,000+ views.

Little did I know that the video she created would become so popular. This month it crossed the 1,000,000 views mark and is still climbing.

In case you haven't seen it yet, here it is. You can view it right here or go to YouTube for a larger version.


Thanks Kirsten for sharing our story with so many people.

Do you want to learn more about our float cabin home and off the grid living? Click on the Float Cabin Living topic in the sidebar or visit my Margy Lutz YouTube page. You can also visit the Powell River Books website and check out some of Wayne's Coastal BC Stories books that are available in print and eBook formats.  -- Thanks, Wayne and Margy

Tuesday, November 20, 2018

Woodstove Safety

When we first got our float cabin, I was a little afraid of the wood burning stove. It was hard for me to get used to a fire burning in a small metal box in the middle of my living room. I had no prior experience with such a thing in my Los Angeles city-folk life. But when the nights (and days) got cold, we quickly overcame our trepidation and started using our Kozi stove.

Wayne's chimney pipe cleaning tools.
When our friend John built the cabin he installed our stove to minimize fire danger, but it's up to us to keep it that way. We watch the stove's components to make sure they are in good condition and replace any that seem worn or damaged. So far, we've replaced the door gasket twice. Fortunately, stove supplies can be found in most hardware stores, at least here in the north.

Wayne on the porch cleaning out the horizontal wall and exterior chimney pipes.

Cleaning the inside chimney and sealing a joint.
Chimney sweeping is crucial for safe wood stove use. Even with our thermometer to monitor fire conditions, creosote and ash build up in the chimney pipe and on our stove's smoke shelf. On a sunny fall day (at least a non-rainy one) we don't build a fire.

First, Wayne goes up on the porch roof to clean the exterior pipe and chimney cap. Next, we go indoors to disassemble and clean the interior pipe and the stove's smoke shelf.


I'm amazed how much buildup there is in just a few short winter months. But on the other hand, our trusty stove is running almost 24/7 that time of year.

If you have a woodstove, do you have any installation, care or maintenance tips? Any funny, or even scary stories? Let's hear them.

Want to find out more about our float cabin living? Try reading Up the Lake. If you use a Kindle or e-book you can get a copy for free at Amazon or most online booksellers.

For more information about all of the Coastal BC Stories books visit our website at PowellRiverBooks.com. -- Margy

Thursday, November 08, 2018

Cabin Baking: Banana Zucchini Cake with Cream Cheese Frosting

Getting organized.
I wanted something sweet for dessert using two things from the freezer, grated zucchini and a mashed banana. I found a recipe online that looked perfect. A bonus was I had everything else I needed on hand. Running to the store isn’t easy to do from up at the cabin.

Banana Zucchini Cake

I used a recipe from Real Housemoms. It was called bread, but easily doubled as a cake. My modifications are in italics.

Ingredients

Beat wet ingredients together first.
1 cup sugar
1/2 cup vegetable oil
1 cup mashed banana (about 2)
1 egg
2 tsp vanilla extract
1 1/2 cup all-purpose flour
1 tsp cinnamon
1/2 tsp baking powder
1/2 tsp baking soda
1 tsp salt
1 cup zucchini shredded
Mix dry ingredients and stir together.
1 cup walnuts chopped

Directions

Beat oil and sugar together. I don’t have mixer so I used a whisk.

Add the mashed banana, egg and vanilla. I only had one mashed banana in the freezer but the batter was plenty moist.
Blend in nuts and raisins (optional).

Mix together the flour, cinnamon, baking powder, baking soda and salt then add them to the wet ingredients. I’m lazy. I mix my dry ingredients together on top of the wet before combining wet and dry.

Using a spoon, fold in the zucchini and walnuts (I used pecans). 

I used a baking dish not a loaf pan.
I had 2 cups of frozen grated zucchini. By the time it thawed and I discarded the water it was one cup. I also added one cup of soaked raisins.

Spray a loaf pan with cooking spray and pour in the batter. I wanted to frost it as a cake so I used a baking dish.

Bake at 350 degrees F for 40-50 minutes or until a toothpick inserted into the center comes out clean.

Cream Cheese Frosting

I chose a frosting recipe from All Recipes.

Ingredients

Cream the ingredients together.
2 (8 ounce) packages cream cheese, softened
1/2 cup butter, softened
2 cups sifted confectioners' sugar
1 teaspoon vanilla extract

Directions

Cream together the butter and cream cheese. Mix in the vanilla, then gradually stir in the confectioners' sugar. I didn’t have enough cream cheese so I made half a batch.

All dressed up and ready to enjoy. Yummy!

I let the cake cool and then spread the frosting on top. Because of the butter and cream cheese, I kept the leftovers in the fridge. But they weren't left over for long. -- Margy

Tuesday, November 06, 2018

Guest Blogger at Terra do Milho in Portugal

The Terra do Milho website.
My digital world reaches far and wide. One stop is the Homestead Blogger's Network,  a community of bloggers writing about self-sufficiency. I found a post about the chop and drop method of dealing with garden waste in a positive way. I left a comment and was surprised to get a personal email from Monique, the author. If you are interested in chop and drop, you can read her post at her Terra do Milho website in Portugal.

A garden image from Monique's blog.
Monique is a farmer and homestead consultant. Her partner Tom is a comedian, farmer and homestead host at Terra do Milho in Portugal. They share their knowledge and experience with others in person with organic farm-stay holidays, consulting services, permaculture design courses, blog and social media publications.

Here are links for more information about Terra do Milho:

Terra do Milho Website
Terra do Milho Blog
Terra do Milho Facebook Page
Monique's Posts on Homestead Blogger's Network

Monique visited my blog and was intrigued with float cabin living and gardening. She invited me to write a guest and I was glad to share a bit of my world with her readers. Here's a sneak peak and a link to the whole article on her blog.

Go to the Terra do Milho blog to read the whole story.

One thing I love about the Internet is being able to travel the world at the click of a key. How about you? -- Margy

Friday, October 19, 2018

Cabin Cooking: Clam Chowder and Sourdough Buttermilk Biscuits

Cool fall evenings beg for comfort foods. One evening using pantry and garden supplies I made clam chowder and sourdough biscuits.

Sourdough Buttermilk Biscuits

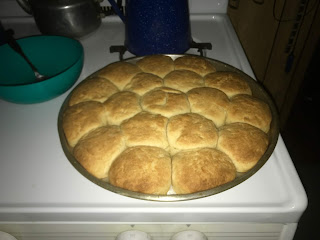
First came the biscuits. I used my sourdough starter to make Sourdough Buttermilk Biscuits from Rita Davenport's Sourdough Cookery.
  • 2 cups flour
  • 1 teaspoon salt
  • 12 teaspoon baking soda
  • 1 teaspoon baking powder
  • 12 cup butter or margarine
  • 1 cup sourdough starter
  • 12 cup buttermilk 
  • butter for brushing the tops
Stir starter and buttermilk together (I used milk) and let rest. Mix flour, salt, baking soda and baking powder. Cut in margarine until crumbly. Combine liquid and dry ingredients. Turn out on a floured board and knead for 30 seconds. Pat the dough in to a 1/2-inch thick round. Cut biscuits and place on a lightly greased sheet (I used vegetable spray). Brush with melted butter. Cover and let rest for 30 minutes in a warm place.  Bake for 10-15 minutes at 425 degrees until golden brown.


 These are flaky biscuits with a distinctive sourdough flavour.

Easy Clam Chowder

While the biscuits were rising, I made the chowder. I didn't follow a recipe, but here's what I did.

Melt 1/4 cup butter. Saute diced vegetables until translucent. I used a stalk of celery, a carrot (from my garden), 1/2 onion, 1/2 pepper (from my garden), 3 cloves of garlic (from my harvest) and 2 teaspoons of dried thyme (from my harvest).

I moved the vegetable to the side of the pan then added 2 tablespoons of flour to the middle and cooked it on low until bubbly.

Next I added milk (about 2 cups) a little at a time, stirring constantly until the consistency was smooth and slightly thick.

I used a pint of my home canned potatoes to add to the chowder. I cut half of them into small cubes. I added the rest with the liquid to the soup and mashed them with a whisk. This really thickened the chowder. Next I added the diced potatoes.

Lastly, I added a can of clams from the pantry, juice and all. To season, I used Lawry's Lemon Pepper (a go-to favourite of mine). As the chowder simmered, I added more milk to keep the consistency from getting too thick.


While the chowder simmered, I baked the biscuits. It took about an hour to prepare, but well worth the wait.

Do you enjoy using staples on hand to made a quick, comfort food meal? What are some of your favourite things to make or recipes to share? -- Margy

Tuesday, October 09, 2018

Overnight Trip to the Head of Powell Lake

We woke up Monday with a workboat neighbour.
Our ocean-going 24' Bayliner spends the winter in Powell Lake's fresh water to keep it clear of marine growth. It's good for the boat and us. We get to use it for mini lake cruises.

In late September we found two good weather days in a row, so we loaded up for an overnight trip to the Head of Powell Lake.

A typical Powell Lake waterfall.
We were amazed at the number of waterfalls and the huge amount of water cascading into the lake. Many of the falls had long drops down sheer rock faces.

We went on a weekend so we could tie up to the logging dock. When we arrived we were the only boat and relished the privacy.

This is a busy logging area, sometimes even on weekends.


On the bridge over the Powell River.
We tied up and walked to the bridge where the Powell River enters the head of the lake. It's the single largest water source. The swollen river crashed down its rock chute to the lake surface. The last time we were here it was summer dry with low lake levels.

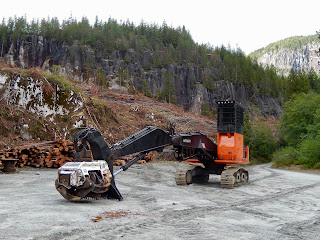
On the way we passed an active logging area. I love looking at the big equipment. Several years ago I got to go on one of Western Forest Products' forest tours. Click here to see a harvester in action.


Logs processed and stacked ready for extraction.

At the log sort near the dock there was one logging truck waiting to bring the logs from the work site to the skid where they will be dumped into Powell Lake. Click here for a video of one in action.

A "fat truck" used only on logging roads for log hauling.

Here's a video of a log dump here at the Head.


We ate dinner on the boat's back deck and the night was calm and good for sleeping.

Leaving the Head of Powell Lake for our float cabin home.

Do you do fall or winter cruising? What are some of your stories? -- Margy

Monday, October 01, 2018

Harvesting and Storing Potatoes

Potatoes growing in a barrel.
Each year I grow potatoes in barrels. I get enough from three barrels for Wayne and I to enjoy through the winter. I've found that Yukon Golds make a nice sized spud that stays firm and fresh when stored for months. Any that do sprout by spring I use for seed potatoes. The barrel on the left is ready to dig because the plants have died back. The one on the right isn't ready yet.

Each barrel gave me a bucket of potatoes.
Last week I dug up four barrels worth to store for winter use. First I let the soil in the barrels dry. I find digging the potatoes out with my hand is easiest on me and the potatoes. Eliminating cuts from sharp objects helps the potatoes store better. To help keep my digging hand and nails cleaner, I wear a latex glove.

Saving soil from potato barrels.
As I dig, I remove the dirt to get to potatoes at the bottom. I save the soil for next year's gardening for anything except potatoes and tomatoes. This year I added the soil to my raised beds in the float garden. Using my own seed potatoes and saving soil reduces my overall gardening costs.

Dry potatoes before storage.
Here's my bounty from one barrel. I left them out to dry and to allow the skin to firm up. It's best not to wash potatoes before storage. Just brush off any excess dirt and then inspect them for damage. Damaged spuds should be eaten as soon as possible. They do not store well and may damage your good produce.

Wrapping potatoes in newspaper for storage.
Store potatoes away from light and in temperatures between 5 and 10°C. If it's too cold, starch will turn to sugar and make them sweet. Paper and burlap bags or cardboard boxes are good for storage. Do not use plastic bags. Trapped moisture will accelerate spoilage. Avoid storing potatoes with apples, onions or garlic. They produce a gas that causes potatoes to spoil quickly. If potatoes are exposed to the light they will turn green. Remove green portions before eating.

Store in a cool location.
I wrap my potatoes in newspaper and store them is open sided plastic baskets ($1.00 each at the Dollar Store). This keeps them away from the light and separates them from neighboring potatoes. The paper allows the potatoes to "breathe" but also prevents too much moisture from escaping.

Pouch potatoes ready to cook in the woodstove.
I keep the baskets under the downstairs bed, the coolest place in the cabin. Properly stored potatoes will remain dormant and will not sprout for about three months after harvesting. That makes for lots of comfort food meals throughout winter. -- Margy