Sunday, June 13, 2010

Cabin Cooking: Taco Time

I used the cast iron griddle my good friend Betty gave me the other night to make hand made tortillas. Wayne got some masa harina (corn flour) for roast beef gravy. So, I decided to marry my new griddle, extra masa and leftover roast to make soft tacos.

The recipe on the bag just calls for masa and water. I tried a test batch and found them to be tasty but crumbly. I decided to modify the recipe to make them sturdier. Here's what I came up with.

Margy's Modified Corn Tortillas

1 cup masa harina (corn flour)
2 tablespoons white flour
1/4 cup vegetable oil
1/2 cup water
I mixed the ingredients together and refrigerated the dough for several hours before cooking. If they are too moist, add a few tablespoons of masa before rolling. I don't have a tortilla press, so I used folded plastic wrap and my rolling pin to make small rounds about 1/8" thick. The tortillas held together as long as I didn't make them too thin or too large. The batch made twelve small tortillas.

A few minutes on each side on the hot griddle and I had tortillas. They have the sturdiness of a flour tortilla and the great taste of a corn tortilla. To keep them warm until serving, I kept them wrapped in foil. Some refried beans, my beef taco filling, shredded lettuce, cheese and salsa made a tasty meal. So much so, that we each ate four. YUM! -- Margy

Saturday, June 12, 2010

Mitlenatch Island Nature Provincial Park

We had a wonderful overnight cruise in the Bayliner. We left Powell River in the afternoon and arrived at Heriot Bay on Quadra Island in time for an early dinner at the Inn. With Halcyon Days' tanks and our tummies full, we motored over the adjacent Drew Harbour to spend the night at anchor.

Today we stopped at Mitlenatch Island. The whole island is a Nature Provincial Park. The environment is very different from neighbouring islands. Because it is in a rain shadow, you will find the rocky cliffs covered with low growing bushes and few trees.

In winter, you will find California sea lions basking on the shores and feeding in the rich waters. In spring you will find wildflowers and nesting sea gulls. Today, most of the wildflowers were gone, but the gulls were roosting in every nook and cranny on the exposed cliffs.

If you follow the path from the north anchorage, you will come to a bird blind. From here you can view the gulls on the cliffs below without disturbing them. A handy guide above viewing window give you tips on behaviour and species identification.


We hiked back down the trail to our waiting Halycon Days. It was such a nice day that we decided to slowly troll on the way back to see if we could catch a salmon. Wayne did hook a nice ling cod, but we let him go. We are the catch and release kind of fisherpersons.

What a wonderful place to live. So many options: boat, quad, hike, kayak and live up the lake. Powell River has something for everyone to enjoy. -- Margy

Thursday, June 10, 2010

Preserving: Oven Dried Swiss Chard

The Swiss Chard I planted last summer finally bolted. I did some research and you can dry chard for later use. That sounded good to me. I picked and cleaned the chard at the cabin and saved only the leaves. The rest of the plants I chopped up to go in my compost pile.

I was heading to town to visit Mom, so I decided to use the condo's electric oven. It's easier to control at low temperatures than my propane oven in the cabin. So I packed up my chard and headed down the lake. First I gave the big leaves a course chop.

Next I needed to find something to use as a steamer. I found two metal pans from the pie shop that had holes in the bottom. I inverted one and filled a pot with 3/4" of water. I placed the other pie pan on top and voila, I had a steamer for free.

Before drying, it's recommended to blanch chard for 3 minutes. This helps stop enzyme activity and prepare it for drying. Some recommend water blanching, but with the delicate chard I chose the steam method. The key is to use small batches so that it blanches uniformly.

Next I used cookie sheets to spread the blanched chard into thin layers for drying in the oven, already preheated on the lowest setting, 150 degrees. I spread the cookie sheets out on the two oven shelves with lots of space for the warm air to circulate.

To allow moisture to escape, I propped the oven door slightly open with metal tongs. I checked the chard every half hour and turned the leaves. I also rotated the pans on the shelves. When I turned the heat off, I left the pans inside the cooling oven. For me, all three sheets were dry in four hours.

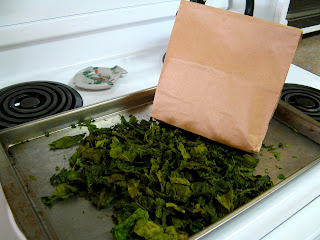
The last step before storing is conditioning. Some leaves may hold residual moisture. To ensure they were all dry, I used a brown bag and left the leaves inside for several days. A few shakes a day helped disperse any moisture. Finally, I stored my dried chard in tightly sealed plastic containers, ready to add as a taste of summer to my winter soups.

Do you dry fruits or vegetables? Now that I've had one success I am ready to try something new. -- Margy

Wednesday, June 09, 2010

Cabin Cooking: Cast Iron Legacy

I've already introduced you to my good friend Betty from Bellingham, better known in the blogging world as Mud Creek Mama. We met through my blog and posts on MySpace several years ago. Since then, we've met regularly for coffee and shopping in the Old Fairhaven district of Bellingham. It has been great fun meeting one of my blogging buddies.

The last time we got together, Betty had a surprise for me. Several of my posts have been about cast iron cooking. And she brought me an extra griddle from her collection. What a wonderful thing for a friend to do. You could tell it was well seasoned from good use over the years. I love it! I couldn't wait to get it up to the cabin to try out.

The first thing I cooked were blackberry pancakes for Wayne using my home canned berries from last year. Wayne said they were the best I've ever made. And I know the secret ingredient. It was all the love from a friend indeed.

Thanks Betty for such a special present. I will treasure it always and make some great meals with it. -- Margy

Tuesday, June 08, 2010

Welcome Aboard

Last night we took the Bayliner out for her first cruise of the season to our favourite anchorage in Theodosia Inlet. This year we got a short-term slip in the North Harbour. That's going to be much easier for us since it's within eyeshot of our condo. I thought you might like to take a tour of boat. Her name is Halycon Days which means happy, joyous, peaceful.

Halcyon Days packs a lot into her 23.5 feet. Up front is a bed big enough for Wayne's long legs. Shelves and plastic bins hold our clothes and personal items. Under the bed is our fresh water tank and bins for stuff you don't need very often. There's a hatch for fresh air and with mosquito netting. You'd be surprised how many mosquitoes there are in anchorages. Tucked under the bed is the outboard motor for our dinghy and a BBQ. Just aft of the bed is a storage area and the captain's chair.

Further aft is a small galley (cupboards, sink, ice box and alcohol stove). Wayne and I don't cook much when we go boating. A box of Chubby Chicken from A&W makes a good first meal and there are lots of places to stop along the way for provisions. Our boating excursions follow the KISS principle as much as possible.

Behind the galley is a head. Don't leave home without one. A holding tank makes it good for the environment as well. Opposite from the galley is a table with two bench seats. It can be converted into a small bed, but we use it mostly for holding "stuff" that we use more often.

The space we use most often is our aft deck. There's enough room for two chairs and a little table. We cook here on our BBQ or a small butane burner (easier than inside). We eat, read, fish and just relax here. If it gets hot, we pop up our umbrellas. It may look silly, but it's perfect for a summer day. Our dinghy (Mr. Bathtub) rests here on the swim grid when not in use.

Up top is the command bridge. This is where we prefer to drive the boat. It gives you a commanding view for both cruising and docking. Plus, it's the perfect spot for a sun bath in private anchorages.

So, welcome aboard. Come cruise with us in Up the Strait and we will take you through the Strait of Georgia and Desolation Sound to islands, bays and inlets where the mountains drop into the sea, and the people have a different sense of purpose. -- Margy

Sunday, June 06, 2010

Beans in a Barrel

Because I have limited room in my floating garden, I use containers on the cabin deck for larger plants. I started with potatoes, peppers, zucchini and tomatoes. Last year I included snow peas. That was so successful, this year I'm trying Scarlet Runner Beans.

Last year I learned that a trellis needs to be very sturdy. I tried 1x1 inch stakes connected with twine. It was fine when the pea plants were young, but by the end of the season the trellis couldn't hold all the weight. So this year, I looked for a sturdier alternative. At Canadian Tire I found a metal trellis for $19.99. It was 23" wide and 72" tall ( (58 X 183cm), a perfect fit for my planter made out of a 55 gallon plastic barrel cut in half.

First I filled my barrel planter with soil. Then I inserted the trellis. To make it sturdier, Wayne drilled the sides of the barrel and wired in the trellis to hold it upright. Then I used 1x1 inch stakes to form a pyramid shape and twine to give the climbing beans plenty of support.

I planted my Scarlet Runner Bean seeds directly in the soil. April was so warm, I thought I could get them in early. But May was so cold and rainy, sprouting was slow. I almost gave up, but finally a few started to emerge. To hedge my bets, I started a few more seeds in peat pellets using my new re-purposed planter stand.

As soon as the beans started to sprout, I removed the outer netting of the pellets and planted them in the barrel. I read at Canada Gardens that you need to wait until the soil reaches 10C before planting. Live and learn. But this time around they did much better. I now have lots of beans starting to climb their sturdy new trellis.

I'm looking forward to green beans for dinner and then some to dry at the end of the season for planting next year and winter soups. Have you ever grown beans in a barrel? I would love to hear how it worked out for you. - Margy

Tuesday, June 01, 2010

Logging Upswing

We live near Powell River in Coastal BC and logging is a very important part of our economy. In fact, the availability of good timber and lots of water for hydroelectric power made it an attractive location for the the paper mill that was built here in the early 1900's. You can learn about the history of timber and logging in our Forestry Museum at Willingdon Beach.

The last several years have been difficult for forestry companies. There's the aftermath of the Canada vs. US softwood dispute, slowdown in new home construction, the recession and the high Canadian dollar for international trade. Up Powell Lake, much of the logging activity is conducted by Western Forest Products. From our cabin porch, we see them head up and down the lake with work boats and barges. I may not be awake at the early hour they go to work, but I can feel the wakes rock my cabin and the waves lap on the logs. That's much better than an alarm clock for sure.

Each year different tracts are logged. This makes a patchwork on the hills and allows for trees to grow back at different rates. In the late 1990's, the hills north of the Hole in the Wall were logged. Trees there are now about ten feet tall and everything is green. Then last fall we got a notice on our cabin door that they would be logging this spring near our cabin. A full parking lot at the Shinglemill told us the time had come.

Last month a large crew arrived and cut behind the cabins in the Hole and around the point towards the main lake. Because of the steep, rocky cliff behind us, our trees were spared. I know the rest will grow back in the years to come thanks to the hard work of tree planters and responsible logging companies. But at the same time, I'm glad mine still have a lease on life. -- Margy