Tuesday, August 09, 2011

The Colours of Summer

Until a week ago we thought we might not get a summer this year. But now we are having some really great weather with lots of sun without extreme heat like the east and south are experiencing.

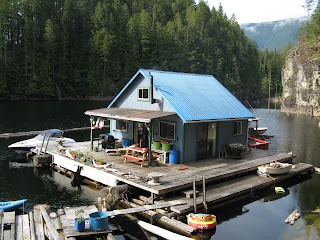
Last year I repurposed a BBQ and made it into a planter. This year I planted some geraniums and they now make a bright, colourful spot under my kitchen window.

Out in front, we have several whirlygigs that spin in the cool afternoon breeze. One we call Buttless Bird. Actually, he's Buttless Bird II because he hasn't lost his tail feathers to stormy winds like his namesake.


And in the water you'll find a variety of painted floats and "toys" like our inflatable BC Ferry. Out in our natural swimming pool, you'll find a big blue whale gliding across the water's surface. I've tried go give him a ride, but he's trickier than a bucking bronco.

As you enter Hole in the Wall, you can tell our cabin from the rest. Whether it is summer, fall, winter or spring, our cabin has that warm, colourful lived-in look. -- Margy

Monday, August 08, 2011

Catching Gramps

Several years ago, our good friend John found a used 14-foot tin boat for us. He fixed it up (including some spiffy red paint) and now it's our get-around boat at the cabin.

Wayne just got us some red molded fold-down seats from Cabella's for $29.99. Not only do they look great, but they are SO comfortable.

They mold right to your body and make fishing even more fun.

Speaking of fishing, we went out in the Tin Boat a week or so back, and did some trolling. Wayne has his Scotty Portable Lake Downrigger that he uses off the right side of the boat.

I just let the line out and hand hold my pole out the left side. Wayne had his flasher, cannon ball, and gear down deep. I had my "lucky lure" dragging behind pretty close to the surface.

We went through some floating wood debris and Wayne had to stop to get untangled. I knew we were in deep water, so I just left my line out. Once we restarted, I thought I was hung up on the bottom. Then I realized it was a fish. A BIG fish.

It took some time to reel him in. When I got the fish close to the boat, my line tension was wrong. Wayne leaned over to help, but the reel fell apart and into the lake. So we had to pull the line by hand to get my fish next to the boat. Because we catch and release, we didn't want to take him out of the water, but we estimate he was about 28" long and nice and fat. Not only was it a great experience to catch "gramps," but we were able to pull in the remains of my line and reel from the lake and get it back together to fish another day.

How about your? Do you have any fishing stories? -- Margy

Sunday, August 07, 2011

Preserving: Freezing Cherries

No, I didn't plant a cherry tree up on the bluff. Even if I did, I'm not sure the birds and critters would leave any for me. I got a bag of Canadian grown cherries at the store and have been enjoying the big, juicy, red treats. The package didn't say what kind, but to me they looked like Bing cherries.

Whatever the case, these were the biggest, juiciest, tastiest cherries I think I've ever had. And they have lasted. So much so that I hated to throw the last few away now that we had to leave for the States. I went online to see how to freeze cherries. And it is so easy.

The hardest thing to decide whether to freeze them whole, or cut and pit the cherries. Freezing cherries with the pits in is obviously the easiest, but if they are going to remain frozen for more than a few weeks the fruit may absorb some of the nutty flavour from the pit. Since mine will probably stay frozen for several months, I decided to remove the pits.

I don't have a cherry pitter, so I cut each cherry in half and removed the seed. I placed the cherry halves on a metal pie plate and placed it in the freezer. Once frozen, they went into a zip seal plastic bag with as much air removed as possible. Then when I return in the fall, we'll have some cherries to enjoy on our ice cream. As they say, "Waste not, want not!" -- Margy

Saturday, August 06, 2011

Tuff Inflatable Dinghy Restoration

When we purchased our Bayliner 3058, we thought the dinghy was big and ugly. All the salesman could say was, "It holds air." Our initial thought was to purchase a new one, but other items had to take priority, primarily a replacement windlass and refrigerator. Then we found out our Quicksilver inflatable is made with higher quality Hypalon.

While we were staying in Richmond during the purchase process, we visited Steveston Marine & Hardware. It's an amazing store with everything nautical you can imagine. At the end of an aisle we found Tuff-Coat inflatable repair kits. They weren't cheap and sounded too good to be true. After we got our boat home to Powell River Wayne decided to order some online. The shelf price for the kit is $179.29, now on sale for $127.99.

The first step is to thoroughly clean the dinghy. Wayne masked the rubber seals. You can paint over these, but Wayne thought leaving them gray would be attractive. The base coat is the most important part of the preservation/restoration process. It brushes on thick, but smooths out as it dries. It seems to meld right into the surface of the dinghy fabric.

After the base coat dries, you apply a coloured top coat. It comes in gray, black, white and red. Wayne loves colourful things. Fortunately our moorage spot it the last on the finger, so Wayne had a good spot to do all the work. It took about four days to complete the painting and drying process for both sides.

Now we have a beautiful dinghy with a restored surface. Rather than getting rid of it and spending lots of money on a new one, we have a distinctive new looking tender that should last us many more years. Job well done Wayne, and great product Tuff-Coat. -- Margy

Thursday, August 04, 2011

Free Firewood

Living off the grid during the winter is possible because we use a woodstove for heat. Keeping it stoked is a year-round proposition. Usually in the summer and fall we gather and cut wood to stuff our floating woodshed. This year we were given enough wood for the majority of our winter needs.

Our good friend John replaced the cedar deck on his float cabin this year. In exchange for some help, he gave Wayne (and me) the old boards. Wayne used our cedar log float to transport the wood over to our cabin. About two-thirds of the wood fit in our woodshed.

The rest Wayne has neatly stacked on the float tied up to our boom. Once we burn enough we will bring the extra wood in to store out of the rain. But for now, we are all set for our winter woodstove. Thanks John for warm days and nights to come. -- Margy

Tuesday, August 02, 2011

Carrots Gone Wild: Saving Seeds

My world has been a bit different this year. I've had limited time at my cabin because Mom's needed my help while recovering from back surgery.

As usual, I left last year's carrots in the ground over the winter for early spring harvesting. However, I wasn't there in time to get them out of the ground. By the time I arrived in early summer, they had already bolted and were beginning to flower. What to do?

My friend Margaret (Thistle Garden) in Powell River suggested I let the carrots go and save the seeds for future planting.

Carrots have a two year cycle, so it is rare to get all the way to the flowering and seed production stage. It will probably not happen again for me since my garden space is so limited. So why not give it a try this time around.

Margaret suggested I cover the flowers going to seed with muslin. This would capture the seeds in my absence. Muslin would keep the seeds in, but dry quickly enough to prevent moulding. Well, I didn't have any muslin so I used some cheesecloth I had left from canning last year. Hopefully the weave isn't to open. Carrot seeds are very tiny. I'll find out the results when I return to the cabin again in late September.

And even after I capture some seeds I won't know for sure what I have. I don't know if the seeds I originally planted were the open-pollinated variety that is required for seeds saving. Hybrid plants don't produce seeds true to the parent plant. They revert back to the components of the hybrid mixture. I'll keep you posted. -- Margy

Monday, August 01, 2011

Carrots Gone Wild: Saving Seeds Part 2

On my July trip to the cabin, I found that my carrots from 2010 had gone wild. Normally I leave my carrots in the ground through the winter to pick as needed, but last year I didn't get back as anticipated. Consequently, my remaining carrots completed their two year cycle and went to seed.

My friend Margaret here in Powell River suggested I try saving the seeds. She said covering the flower heads with muslin (I used cheesecloth) would contain the seeds. When I got home this week, the heads were all dry and ready to pick. There were more seeds than I could ever use, so I chose the biggest and best.

Removing the seeds from the heads was easy. All I had to do was rub them with my finger and then fell right off. I did find a few aphids, so I finished drying them outdoors on the porch. There's plenty for me and for Margaret to share.

Now the big question is, what will they produce? I'm not sure what variety I planted two years ago. I think they are either Scarlet Nantes or Chantenay. If so, they are probably non-hybrids and will reproduce true. If not, who knows what may result. I plan to plant the seeds in one of my four raised beds next spring and see what happens. It's worth a try to complete the experiment. -- Margy