Tuesday, November 28, 2017

Undercover Gardening

The last of my lettuce and greens.
Fall is the time I put most of my garden to bed, but with a little bit of care the growing season can be extended and outdoor plants in containers can be protected through the cold months. When my rhubarb stops producing in fall, I cover the container to protect the roots.

My rhubarb growing in a container.
I start by removing any remaining small stalks, then crumple newspaper to provide several inches of insulation.

Air pockets in the scrunched up paper provide protection from cold and ice. Next comes a round of cardboard.


The final step is to cover the cardboard with soil.


I have protected my rhubarb like this for over ten years. Last year it was doing so well I was able to divide the roots.


The other thing I do in fall is protect the last of my greens to enjoy them for as long as possible. I use either plastic mesh or small tomato cages to support covers made from clear tall kitchen plastic garbage bags. It makes a quick and easy greenhouse.


The bags protect the containers from getting too wet during fall rainstorms. They also focus warmth from the waning sun and protect the plants from the worst effects of freezing temperatures.


The plant that did the best using my impromptu green houses was Corn Salad. In a small container it doesn't produce much, but the fresh tasty leaves continued to use in salads throughout winter.


Last summer I made a hoop tunnel to protect my lettuce from the hot summer sun. It continues to provide protection for the remaining lettuce, chard and arugula.

Do you grow fall and winter crops? How do you protect them for extended harvests? -- Margy

Monday, November 20, 2017

Stocking Up the Woodpile

Living off the grid has a lot of joys. It lessens our environmental footprint, we have a simple lifestyle, and it challenges us to do things differently. Colder months are coming, and our heat is 100% from wood. Our Kozi woodstove does a great job, but it needs lots of wood.

Summer through fall we gather wood. Much of it floats up to our cabin begging to be captured. Our flatbed barge now allows us to gather drier wood from nearby beaches.

A visit to Sandy Beach.

Our first choice is chunks already woodstove size. Our second is larger pieces that need splitting. Because we see lots of wood on its way down the lake, we can be choosy.

Our cedar log float is instrumental in our wood gathering and processing process. We can tow it to a location to pick up wood, store collected wood until cutting, and it even serves as a cutting platform that can be placed directly across from our woodshed float.

The key component of our wood storage system is a floating woodshed. It keeps weight off our cabin deck, yet the wood is handy for restocking our indoor wood shelf. To give us more space, our good friend John added a third bay.


Our woodshed has one section for kindling and our log splitter. The other two sections hold about two cords each. Now all we need to do is saw and split the last lengths.  Then we'll have enough wood to get us through the worst of winter, with an extra load waiting on the raft for future needs.

Our Kozi woodstove will keep us warm all winter.

All that wood will keep us "Kozi" warm for months to come. How do you heat your home in winter? -- Margy

Tuesday, November 14, 2017

Coastal BC Fungi: Fly Amanita

Fly Amanita

Fly Amanita mushroom, Powell Lake BC.
You can tell it’s mushroom season in Powell River when buyers arrive and ‘shroom shacks pop up in storefronts as fast as their namesakes.

I was walking up the cliffside stairs twhen I saw a red “ball” next to the steps. My first thought was a critter raided my compost pail and dropped a ripe tomato on its way up. My second thought was, it’s October and there are no more tomatoes, even in my garden clippings.

A small Fly Amanita also called Fly Agaric.

When I got closer I noticed it was a round, red mushroom. I’ve never seen one like it before. I went online to Google images and almost immediately found it, a variety of Amanita with the scientific name of Amanita muscaria, more commonly Fly Amanita or Fly Agaric.

Surrounded by moss and decaying Salal leaves

Fly Amanita is one of a family of poisonous gilled mushrooms. It’s easy to identify and avoid with its red, orange or yellow cap. It starts rounded then flattens out and turns up as it matures. Around the edge, and across the surface, are cream-coloured to white spots or warts.

Side view showing white spots or warts.

The immature one I found was about an inch in diameter, but they can reach up to twelve inches across when open. I went back to get a picture of the mature state, but alas, some animal had eaten it down to the ground. I guess the toxic components aren’t deadly to all critters. Animals usually know not to eat poisonous things.

One mushroom all alone next to the stairs.

The Fly Amanita is most commonly found in or near coniferous forests during the fall. It’s well known as the mushroom depicted in fairy tales. The unusual common name comes from the belief that you can make a product that will kill flies.

Have you ever seen a Fly Amanita? What do you think? -- Margy

References: The Savory Wild Mushroom by Margaret McKenny (University of Washington Press, 1971) and First Nature (online).

Saturday, November 11, 2017

Cabin Cooking: Candied Citrus Peel

Last summer when I made orange marmalade, I candied the leftover peels. What a treat!

Since then I've been saving citrus (orange and grapefruit) peels from our breakfast fruit bowls for another batch.

I selected a recipe from Bright-Eyed Baker's blog for Candied Orange Peel to follow. She has excellent directions and photographs for the steps to follow. Here's her recipe with my modifications in italics.

Candied Orange (Citrus) Peels

Ingredients:
  • 3 navel or valencia oranges
  • 1½ cups granulated sugar
  • ¾ cup water
    Directions:

    Wash oranges and remove peels. Slice off excess white pith and cut into ¼" strips. Save fruit for another use.

    Poaching the citrus peels to remove bitterness.

    Place the peels in a saucepan and cover with cold water. Bring to a boil then drain. Repeat two more times to remove some of the bitterness.

    Each time I made a fruit bowl for our breakfast, I processed my orange and grapefruit peels. Once cool, I froze them in plastic bag so they would be ready to use.

    Thawed citrus peels and preparing the syrup.

    In a small bowl, whisk together the sugar and water. Pour into a saucepan and bring to a simmer. Let the syrup mixture cook for 8-9 minutes at a constant simmer.

    Add the peels and cook for 45 minutes to an hour until they are translucent and the syrup reduces. Adjust the heat as needed to maintain a simmer.

    Simmering the peels in the syrup.

    Avoid stirring, as this will cause crystallization. If necessary, swirl the pan to make sure that all of the peels stay covered with syrup. This is where I goofed. The syrup on my peels crystallized. They taste fine, but aren't attractive. Visit MakeMessy's blog for more information.

    Removing the finished peels from the syrup.

    Drain remaining syrup and set aside for other use. There will probably be about a tablespoon or two left. Spread the peels out on a drying rack and leave to dry for 4-5 hours. Store in an airtight container.

    Making candied citrus peels into a fruit leather.

    I decided to use the leftover syrup to make something like a fruit leather with embedded candied peels. I covered a cookie sheet with parchment paper before pouring the syrup over the peels.


    I don't have a dehydrator so I used my oven on low (150 degrees) for the drying process. It took several hours for the syrup to thicken into a fruit leather consistency. 


    I removed the pan from the oven to cool. It was still quite sticky, so I rolled it right in the parchment paper. Then I used a Ziploc bag for storage. To enjoy my concoction, I unrolled the paper and pulled off as much as I wanted for a serving. It was finger licking good with a hint of orange bitterness!


    Do you candy orange or citrus peels? What method do you use? -- Margy

    Saturday, November 04, 2017

    Coastal BC Bird: Song Sparrow

     Song Sparrow Antics

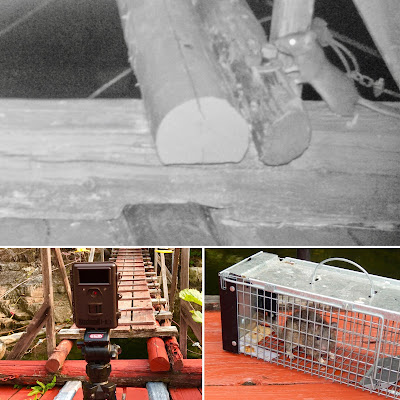
    Several years ago I purchased a Bushnell Trophy Cam. You can read about it here. I've been very happy with it. Rather than getting a critter cam to hunt wild game, I use it to discover who's hanging around the deck of our float cabin home.
    Usually I set it up during woodrat (packrat) season. When I suspect one is in the vicinity, I use the camera to make sure before asking Wayne to set up our Havahart live trap. While I don't like disturbing wildlife, I need to protect my garden plants. Trapping and relocating critters is a compromise.

    This week when I found dirt on the cabin deck around one of my empty pots, I decided to use my camera to determine what was going on.


    I discovered the Song Sparrow that arrived this week was the culprit. He was looking for seeds in the soil, and flicking dirt out onto the deck in the process.

    It's hard to get mad at this little guy. With all of our summer birds gone, it's nice to have one around to keep us company. Do you have any winter birds to brighten your days? -- Margy