Saturday, April 28, 2007

Using Propane for Power

Our original propane stove.
Power in a remote, off-the-grid cabin takes many forms. When we purchased our float cabin, it came with propane. This was our first time to use propane. Of course, in the city, we were used to natural gas for heating and appliances, but propane in its own tank was new and a little scary. In the beginning, we only used it for the burners on the stove. Now that we are more comfortable with propane, we use the propane powered refrigerator and lights.

Propane is also called LPG (liquefied petroleum gas). Many people use it in small canisters for camp stoves and barbeques.

Checking the tanks in the shed.
Rural houses are often designed to use propane from large outdoor tanks, much like city homes use natural gas. Propane is transported and stored in tanks as a very cold liquid. Liquid propane is turned into a gas inside the tank which is transported through thin pipes to appliances.

Care needs to be taken when using propane as a power source. The vapors are heavier than air, so they can build up in low spots and be ignited by a flame or spark. If care is taken to check all pipes and fittings, and to locate storage tanks outdoors, there is little danger. Also, to make it easier to detect a propane leak, a chemical has been added to give it a distinctive smell.
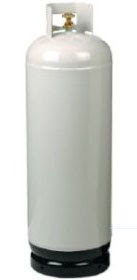
Propane tank.
We have three 40 pound propane tanks that are housed in a lean-to on the side of the cabin. One tank usually lasts us about four weeks in winter when we are using it for lights, cooking and the refrigerator. In the summer, when we don’t need the lights, it lasts about a bit longer. Having spare tanks makes it easy to swap them when we run low. An empty tank is fairly light, but a full one is pretty heavy to haul down the dock and into the boat. A dolly (hand truck) makes the haul a little easier.

One thing we had a hard time understanding was, “How can a gas flame create cooling in a refrigerator?” The Gas-Fridge.com website says:

Our original propane fridge.
"The basic principle is to create cooling through evaporation. An ammonia mixture sealed inside the cooling unit is heated by a gas burner, which causes it to circulate before it evaporates and creates a cooling effect. The continuous heating, evaporating, and condensing is a never-ending cycle that keeps your food and beverages cold." Now we can have ice and make ice cream at our cabin for those warm summer days. Can’t wait!! -- Margy

Thursday, April 19, 2007

Woodstove Cooking: Dutch Oven Apple Crisp

I’ve also baked Apple Crisp using my Dutch Oven. I put a wire rack in the bottom and place the baking pan inside. This way the crisp doesn’t burn while the Dutch Oven is directly on the stove’s hot surface. Hot rocks on the lid help with top browning.

Dutch Oven Apple Crisp

The ingredients and preparation for this Apple Crisp are simple for cabin or camp cooking.

4 Granny Smith or tart apples
2 tablespoons flour
½ cup granulated sugar
1 teaspoon cinnamon
½ teaspoon nutmeg

Core, peel and slice the apples. Mix apples, flour, sugar, cinnamon and nutmeg in a bowl. Place mixture in a greased 8” round cake pan that is at least 1” deep. I use a metal pan to better conduct the heat.

¼ cup softened margarine
½ cup flour
½ cup quick cooking oats
½ cup dark brown sugar
1 teaspoon cinnamon

Mix topping ingredients in a bowl until crumbly. I find fingers work best. Sprinkle over the apples. The pan will be very full, but the apples will cook down. Bake for 30 minutes at 350 degrees in a conventional oven or until the topping is browned and the apples are bubbling. In my Dutch Oven it takes about one hour. Watch, it may bubble over. It is great with ice cream (if available) or whipping cream (a cabin standby). -- Margy

Wednesday, April 18, 2007

Spring Cruise to Theodosia Inlet

Spring is a good time to cruise the Georgia Strait and Desolation Sound if you keep an eye on the weather. You can usually find several days in a row with warm sun and limited wind. One of my favorite destinations is Theodosia Inlet. When we went there last spring, we were the only boat.

To get to Theodosia you need to enter from Desolation Sound via Okeover Inlet. You're likely to see swirls and eddies of tidal currents on your way. Then its left up Lancelot Inlet until you reach the narrow winding entry into Theo.

It's best to enter is slack high tide because of submerged rocks and shallow water, but you'll see logging boats roaring in and out at all times. So, keep an eye on the horizon as well as the bottom.

The best anchorage is behind the island near the entrance to the inlet. From here you can see all the action at the logging dock and the gorgeous view of the snow capped peaks beyond Powell Lake. The inlet is a shallow lagoon with sloping shores where you can beach a dinghy. Hike the logging roads to see some of the interior. Try a little fishing.

The Theodosia River at the head is known for Steelhead from January through May, Cutthroat Trout from January through July, and Coho Salmon from September through October. This is also a good time to watch Bald Eagles fishing for a few salmon of their own. Ever catch a shark? The muddy bottom of the inlet is the home of many Dogfish. This abundant form of shark can live to 100 years of age and give birth to live young. In "Barbless Hooks" from Up the Main Wayne tells about an exciting (but harmless) shark encounter.

Want to try it by kayak? I recommend Powell River Sea Kayak. They are located in nearby Okeover Inlet and can provide you with tours, rental equipment and lessons. If you are in the market for one, they have new and used models. We got our "yellow banana" from them at the end of the season several years ago for a really good price. -- Margy

Sunday, April 15, 2007

Texada Island Airplane Camping

Wayne and I like to camp by airplane. We travel frequently to Canada and have found Texada/Gillies Bay Airport (CYGB) to be an excellent place to stop for overnight or longer. After you clear immigration and customs (we like Boundary Bay or Nanaimo), Texada Island is only a short distance away, about 50 miles north of Vancouver.

Final approach at Gillies Bay Airport.

The island is about 32 miles long and 6 miles wide. The airport is 3000’ of asphalt along a flat ridge in the northern portion of the island.

Parked near the small terminal.
The current airport manager is Valerie. She has a wealth of information about the area. Day parking is free, but there is a fee for overnight. The camping area is grassy with picnic tables and a fire ring. Public transportation is limited.

The camping area with picnic tables.
There used to be are several bikes you can take to Gillies Bay. Check with Valerie, but beware, the hills are steep. There are trails to the village and beach, so walking/hiking is an option. If you call ahead, some of the restaurants and lodging facilities will provide pick-up services. Two you might try are Ravenous Raven in Gillies Bay.

The beach below the airport.
We went to Texada this spring for a day trip and hiked the trail to the beach. You can either take the dirt road north of the runway or a trail just past the windsock. We used both to make the trip into a loop. Both are easy to walk. If you take the road, bear to the right at each junction and follow it downhill to the beach.

A lush understory along the trail to the beach.
There are several ways to reach the water. We like the one at the end of the road. Bring a picnic. It’s likely you will have the whole beach to yourself. To take the trail back, retrace your steps and then take the first dirt road to the right and exit at the windsock. Years ago, this was a fir and hemlock forest, but it has since been logged. One caution, say on the trails. The forest floor is covered with bright green stinging nettles. On our spring walk we saw deer, robins, lots of Horsetail Fern and flowers just starting to bloom.

Parked near the camping area.
There are no aircraft services at Texada Airport, but you can get fuel, if needed, at nearby Courtenay Airpark on Vancouver Island.

Each summer in July there is a Texada Island Fly-In. The weekend is filled with events for pilots and aviation enthusiasts alike.

I hope you get to enjoy Texada Airport and the beauty the island has to offer. -- Margy

Saturday, April 14, 2007

Handpainted Buckets

A painted bucket for paper kindling.
During rainy months there's more time to spend in our cabin snuggling up to our wood burning stove. At these times, I enjoy crafting. One of the first projects I tried was painting a galvanized pail to hold newspaper. I used our cabin as the picture on this one. I then made one for our friend John using his cabin as the picture. My most recent pail depicts the view from our front room sofa. You can see the fire blazing and Goat Island through the front door. This is the view Wayne sees while working on his computer to write his Coastal BC Stories.

Ten steps to beautiful handpainted buckets:
    Newspaper bucket.
  1. I start with a galvanized pail. The ones I buy at Canadian Tire have a large label, so I remove it with soap and hot water, and a little "Goo Gone" if necessary.
  2. I sand the area I plan to paint. This gives the metal surface better gripping power for the paint to come. Clean the surface of any dust.
  3. Cover the parts of the pail that you do not want to paint with newspaper and tape.
  4. For my undercoat, I use two coats of Krylon spray-on primer paint. This prepares the metal surface to receive and hold the decorative paint. Remove the paper and tape when dry.
  5. I draw the picture to scale on a sheet of paper. I include much of the detail, but I keep the original photo handy as a reference throughout the painting process.
  6. I transfer the picture to the bucket lightly with pencil. Sometimes I cut sections from picture and trace them onto bucket. If you make a mistake, you can erase if you are careful. You could also use carbon paper.
  7. I use Liquitex acrylic artist paints that come in tubes. They are available almost everywhere and have good coverage.
  8. I start with a base coat of acrylic paint over the entire area to be painted. I dry brush some acrylic paint over the galvanized metal to reduce the harsh edge created by the primer.
  9. I paint the picture a section at a time, allowing for drying in between. The biggest danger is smearing wet paint onto a previously painted section. But with acrylic paint, you can remove most mistakes with a little water and a paper towel.
  10. After I finish the painted picture, I spray over it with Krylon polyurethane. This protects the painted acrylic picture from chipping during display or use.

The woodstove on one side.

Painting is fun. A galvanized pail is inexpensive and a few basic colors of acrylic can be mixed into a rainbow's worth to meet all of your painting needs.

The view of the woodstove and lake from the sofa.

Give it a try if you are looking for something to do on a rainy day. -- Margy

Friday, April 13, 2007

Goat Lake Mountain Goats

The Pacific Weather Centre of Environment Canada called for northwest winds of gale force after frontal passage later in the day, so we decided to make our boat trip to Goat Lake a day trip. John and his dog Bro came up to the cabin to join us. Since we weren't going to spend the night, we all climbed aboard the Bayliner to travel together in style. To get to Goat Lake, you take the eastern arm of Powell Lake and then navigate up Goat River. With the lake levels so high, the river was wide and slow moving. Depths were good, but we still had to be watchful for submerged stumps and snags. This portion of the trip followed one leg of the famous Powell River Forest Canoe Route, a trip with 8 lakes, 5 portages and a total distance of 90 km (56 miles) starting at Lois Lake and ending at the Shinglemill Marina.

John spotted Mountain Goats on the extensive granite cliffs with his "eagle" eyes. Wayne and I needed binoculars to get much of a view. Their white puffy coats and leaping maneuvers made them stand out against the mottled grey stone.

We stopped at the head of Goat Lake for lunch. John and Wayne took quick trips in our dinghy up the Eldred River until shallow water and rapids turned them back. There's good fishing here in season.

On our return voyage down Goat Lake we spotted a River Otter sunning himself on a stump. He slipped quickly into the water. In Powell Lake a stately Trumpeter Swan paddled in the opposite direction. On a smaller scale, we saw mosquitoes for the first time this season and even a Water Strider skimming on the lake surface.

By the way, the wind never came as far inland as our cabin. But that's OK. We still had a wonderful trip to get a taste of spring. Would you like to read more about the lakes, trails and life in Coastal British Columbia? Go to PowellRiverBooks.com for more information. -- Margy

Monday, April 09, 2007

Woodstove Chimney Sweep

If you've been following my blog, you know Wayne and I are fairly new to wilderness living. We purchased our float cabin on Powell Lake in 2001. As visitors to Canada, we can live here six months each year.


We like all seasons, so we always choose several winter months. Our KOZI woodstove makes this possible. It gives us all of the heat we need for warmth, plus a little extra for stovetop cooking.

I noticed the stove had started smoking when the door was open. A few days later, smoke was escaping from the seams in the chimney pipe. Something was wrong with our trusty stove. 

Wayne went up a ladder to check the pipe. He rapped on it causing creosote to fall towards the stove. When that didn't solve the problem, he went on the porch roof to do the same outside. He got the same result, falling creosote. He also dislodged quite a bit of creosote from under the cap.

By this time there was no air (or smoke) getting through the pipe. Each time I closed the door after starting a fire, it was snuffed out. At this point we would have normally have called our friend and mentor John for help. Instead, Wayne went back up the ladder and disconnected the pipe so it could be lifted out of the hole where it attaches to the stove.

The pipe entrance and stove's smoke shelf were completely clogged with ash and dislodged creosote. We scooped it out and reattached the pipe. A few days later, Wayne went back on the roof and did the same procedure outside.

Periodically we burn a commercial chimney cleaning log to reduce creosote from adhering to the inside of the chimney.

This spring we learned a valuable lesson. The creosote may turn to ash, but that ash needs to be removed to keep the pipe open for adequate air flow, not to mention to reduce the danger of chimney fires. We were lucky our problem happened on a fairly warm spring day. Usually there's a fire going 24/7 from fall through early spring. Our stove and chimney are now on our annual spring cleaning list.

Would you like to learning more about starting out with wilderness living? Up the Lake in the Coastal BC Stories series has tales about our float cabin living experiences. It is available in print and Kindle formats from Amazon, and many other online booksellers. -- Margy

Saturday, April 07, 2007

Woodstove Cooking: Dutch Oven Pineapple Upside-Down Cake

I used my trusty Fannie Farmer cookbook to find a recipe that I could use to Dutch Oven Pineapple Upside-Down Cake on top of my woodstove. Here's my version of the recipe using oil in the cake rather than margarine. It comes from Fannie's Quick Gold Cake recipe on page 826. The resulting cake is rich but with less fat than recipes using margarine.

Dutch Oven Pineapple Upside-Down Cake Revised

Arrange 4-5 slices of canned pineapple in one layer in a greased 8” round cake pan that is at least 1” deep.

3 tablespoons margarine
¾ cup dark brown sugar
¼ cup pineapple juice
Dash nutmeg

Melt margarine on low heat. Add sugar and heat until blended. Add pineapple juice and heat until everything is dissolved. Add nutmeg. Pour over pineapple.

1/4 cup vegetable oil
1/2 cup milk
1 egg (or substitute) beaten
1 teaspoon vanilla

Mix liquid ingredients with the beaten egg.

1 1/8 cup flour
2 teaspoons baking powder
½ teaspoon salt
2/3 cup sugar

Mix flour, baking powder, salt and sugar in a bowl. Add wet ingredients and stir until blended. It will be thick. Spoon the cake mixture over the pineapple and smooth the top. Some of the sugary liquid may ooze up. Bake for 35 minutes at 400 degrees if you are using a conventional oven.

I use a cast iron Dutch Oven on top of my KOZI wood-burning stove for baking. First, I place the pot and lid on top of the stove to heat. After I place the cake pan inside, I put hot rocks on top of the lid as an additional heating source. Replacing the rocks with hotter ones throughout baking keeps the temperature higher. I use a wire rack in the bottom on the Dutch Oven to keep the baking pan from burning on the bottom.

During the last half hour of baking, I put the tip of a wooden spoon under the lid to make a small crack. This lets the moisture out and allows for a little more browning. Baking it this way, it takes about an hour (depending on the heat of the fire). It always bubbles over a bit. When the top starts to brown, and a toothpick comes out clean, it is done. I like to serve it warm with whipped cream on top. Yum!! -- Margy