Throughout Canada everyone knows about Hockey Night in Canada and its distinctive theme song that was dubbed "Canada's second national anthem." However, when CBC lost the rights it had a contest for a replacement.
We have our own Hockey Night in Powell River. The Kings are Powell River's Junior "A" Hockey Club. Young men from across Canada (and a few from the States) to play for the glory of our home town.
Home games are held at Hap Parker Arena in the Recreation Complex, and great seats are always available.
You will see young, old and everyone in between cheering on our team. And you will meet Rocco, the King's mascot. In his personal Kings uniform, this feisty lion can rouse the team to victory.
Come join us for Hockey Night in Powell River. The games are exciting, the food is tasty (love those chips 'n gravy) and see all your friends in the stands. You might even win the 50-50 draw. Can't make the game? Listen live on Powell River's CoastFM 95.7. -- Margy
Powell River Books publishes the series Coastal BC Stories by Wayne J. Lutz.
Tuesday, February 27, 2018
Friday, February 23, 2018
Second Sunset
This time of year we don't get many hours of direct sunlight at our float cabin home. The sun "rises" over the treetops at about 9:00 a.m. and "sets" behind more trees early in the afternoon. Of course, that is well before actual sunset.
Later we experience what we call second sunset. Sunlight skips over our cabin but illuminates Goat Island across the bay from our front porch. Starting at about 5:00 we watch the shadow of the Bunster Range walk up the face of Goat Island for the next half hour. We call that our "second sunset."
Of course, sunsets are only visible on sunny days. Those have been few and far between this month. -- Margy
Tuesday, February 20, 2018
Winter Quad Ride on Goat Island
We waited a long time for a sunny weekend to go quad riding. Logging roads in working forests are available for public recreation after 6:00 pm or on weekends and holidays.
On a sunny Saturday we headed for a favourite destination, Goat Island.
We took our new Garmin VIRB Ultra30 with us. Here are three short videos from the film taken on that trip.
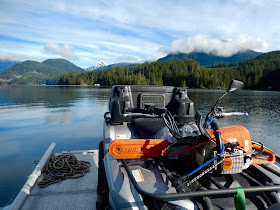
We left Hole in the Wall in our barge with the quads loaded out front. We headed north in calm water to Western Forest Products' Goat Island (Clover) Dock. We used their barge ramp to off-load and later on-load our quads.
We used Frog Pond Main to get up to Spire Main on the southwest side of Goat Island. On the way we encountered deep snow on the road, which surprised both of us.
After turning around we went on a spur in search of two large trees we can see on the ridge of Goat Island from our float cabin home in Hole in the Wall. We didn't succeed, but had a great ride on an older deactivated road.
Thanks for coming along on our ride. We had a very enjoyable day and learned a lot about our new camera. And later I also learned a lot about using the new version of iMovie to create my videos.
Do you create videos about your activities and adventures? What kinds of cameras and software do you use? -- Margy
Saturday, February 17, 2018
Crochet Sofa Armrest Covers
My mother was a crochet expert. I wish I'd taken the time to learn from her, but my life seemed too busy at the time. Now that I'm retired and live in an off-the-grid float cabin I have plenty of time to learn new skills.
I needed a book for guidance. Crochet: A Basic Manual for Creative Construction by Mary Tibbals Ventre (Little Brown and Company, 1974) is perfect. It has detailed photographs and easy to follow directions.
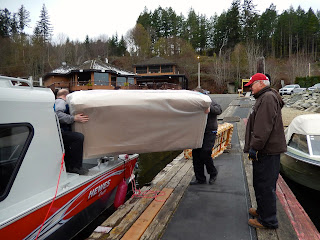
We purchased a sofa in 2013 and brought it up the lake in our boat. Now I've decided to make armrest covers before there's any more wear.
I picked a single crochet pattern involving a circle and a rectangle. Stitched together they form a snug armrest cover.
Directions for a spiral circle from Crochet by Mary Tibbals Ventre:
Make a foundation chain of three stitches and then make seven single crochets into the third chain stitch from the hook, which is the first stitch of the foundation chain. Mark the completion of the first round. (I used a small safety pin.) For the next round make two single crochets in each single crochet stitch of the previous round for a total of fourteen stitches. Mark the completion of the round.
For the third round, again make two single crochet stitches in each single crochet stitch of the previous round, for a total of twenty-eight stitches. After these three rounds, fewer increases are needed to keep the circular form flat. The number of increases will vary with the kind of yarn used, hook size and tension. A more or less accurate way of making a larger circular form is to alternate rows of single crochet that are not increased with rows of single crochet that are increased.
Directions for the rectangle:
Make a rectangle large enough to cover the sofa arm. Mine began with 75 chain stitches and then row after row of single crochet. The tricky thing for me was to remember to do an extra chain at the end of each row before turning to maintain the same number of stitches. Crochet 101 at The Stitchin' Mommy has excellent step by step illustrations.
Stitching it together:
I used a craft needle to weave in the yarn tails where I had to join pieces together. Then I lined up the end of my finished rectangle with the circle and stitched them together with matching yarn. I liked the spiral look of my circle so I chose that for the outside.
The result was a perfect fit. And using single crochet made a thick durable cover to protect the sofa arms from further wear.
Do you crochet? How did you learn? What kinds of things have you made? -- Margy
Friday, February 09, 2018
Rainbow in the Notch
Today it was partly cloudy, but with extended periods of sun inbetween. Late in the day there was a shower over Goat Island backlit by the setting sun.
The rainbow started right in The Notch, a deep cleft in Goat Island's hillside. Wayne wrote about hiking part way up this very steep creek bed in Chapter 6 of Up the Winter Trail.
Up the Winter Trail is available in print and ebook formats from Amazon and other online booksellers. Print versions are also available in Powell River at Coles bookstore. -- MargyExcerpt from Up the Winter Trail by Wayne J. Lutz
The stream is still narrow but now rushing. I see a triple falls above me, and it seems there’s no way to go higher. So I veer off to the side, finding a boulder with a log wedged above it. I try to use the rock and log to climb up the cliff and out of the ravine.
My first attempt sends me back down to safer footing in the bed of the creek. Then, I find another route that leads up the opposite side. By kicking my boots into loamy outcroppings in the cliff, I use toeholds and tree limbs to heft myself up and out of the canyon.
I emerge from the Notch into an area covered with prickly blackberry vines – “nature’s barb wire,” as John calls it. The vines grab at my pant legs and boots, and I try to kick them away. This is hopeless, so I use my walking stick and gloves to tear the vines away. Some I drag along with me.
I walk along the top of several logs that criss-cross over the vines, leading to a huge, smooth boulder. It’s a perfect place to rest. I spread my whole body on the granite surface, lying down flat on my back. Sunlight filters through the trees as I relax in this placid spot.
Tuesday, February 06, 2018
A Winter Ride Down Powell Lake, BC
A calm but cloudy day at Hole in the Wall. |
Our ride to town was bouncy but safe. We watched a Powell River Kings hockey game and stayed overnight in town. In the morning we left for home with enough groceries for another week or so up the lake at our float cabin home.
Thanks for visiting and I hope you enjoyed taking the boat ride along with us. -- Margy
Saturday, February 03, 2018
Canning: Pressure Canning Potatoes
I grow potatoes in a hillside potato patch created from compost. I also grow potatoes in containers on the deck. I harvest in August or early September then store my crop in open plastic trays under the guest bed downstairs.
This year I got four trays of potatoes. We've eaten one and one I'm saving for seed potatoes.
Rather than letting them all sprout, I decided to preserve one tray full in my pressure canner.
I follow a Safe Canning Recipes Facebook page. They have a blog with links to safe tested canning recipes.
I've had a Presto pressure canner for months but have been afraid to use it. I was recently inspired to try canning potatoes.
I used a recipe from National Center for Home Food Preservation and a link to basic safe canning procedures. Refer to them for full directions.
Procedure:
Wash and peel potatoes. Place in ascorbic acid solution to prevent darkening. If desired, cut into 1/2-inch cubes. Drain. Cook 2 minutes in boiling water and drain again. For whole potatoes, boil 10 minutes and drain.
Add 1 teaspoon of salt per quart to the jar, if desired. Fill jars with hot prepared potatoes, leaving no more than 1-inch headspace.
Cover hot potatoes with FRESH boiling water, leaving 1-inch headspace and covering all pieces of potato. (Do not use the water you cooked the potatoes in; it contains too much starch.)
My float cabin is less than 1000' in elevation so I processed the jars for 35 minutes at 11 pounds of pressure. Follow this link for detailed processing times.
I got eight pints from my tray of Yukon Gold potatoes. We'll keep these on the shelf to eat after the remaining basket of fresh potatoes is finished.
These will get us through several months while waiting for a new crop.
Do you use a pressure canner? What kinds of foods do you put up for your pantry? What are some of your family's favourites. -- Margy
This year I got four trays of potatoes. We've eaten one and one I'm saving for seed potatoes.
Rather than letting them all sprout, I decided to preserve one tray full in my pressure canner.
I follow a Safe Canning Recipes Facebook page. They have a blog with links to safe tested canning recipes.
I've had a Presto pressure canner for months but have been afraid to use it. I was recently inspired to try canning potatoes.
I used a recipe from National Center for Home Food Preservation and a link to basic safe canning procedures. Refer to them for full directions.
Canning White Potatoes
Procedure:
Wash, peel, place in ascorbic acid solution |
Cook and rinse. |
Place potatoes in sterilized jars. |
My float cabin is less than 1000' in elevation so I processed the jars for 35 minutes at 11 pounds of pressure. Follow this link for detailed processing times.
I got eight pints from my tray of Yukon Gold potatoes. We'll keep these on the shelf to eat after the remaining basket of fresh potatoes is finished.
These will get us through several months while waiting for a new crop.
Do you use a pressure canner? What kinds of foods do you put up for your pantry? What are some of your family's favourites. -- Margy